latest news
ICR/ICRm wagons now for sale.

ICR/ICRm wagons now for sale.
Want to start or grow your collection by more than one product? Use these coupon codes for bulk discounts:
GIMME2 = 10% off two products
GIMME3 = 15% off three products
GIMME4 = 20% off four or more products
Subscribe to the mailing list for occasional updates and important announcements.


The audio blueprint for Dovetail Games Train Simulator is one of the more complicated aspects of creating content for the game. Here I'll go through the basics of the audio blueprints for a rail vehicle, but the principle is the same for scenery audio objects too.
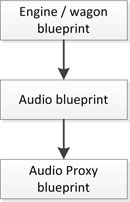
For almost all the audio in the game, there are two blueprint files. The audio blueprint and the audio proxy blueprint. Very important: Don't ever try to export either audio blueprint on their own. The blueprint editor has some interesting bugs in it that can destroy all the values and if the blueprint is re-saved after an export, the XML file becomes corrupted.
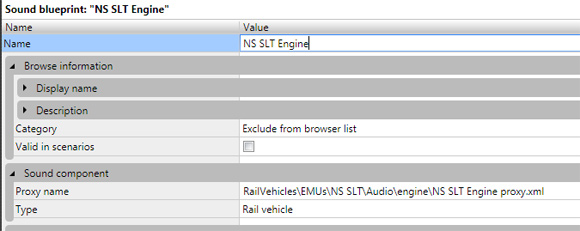
The audio blueprint is really only a placeholder that points to the proxy blueprint, but it's the one that your engine, wagon or scenery object needs to reference. It looks like this:
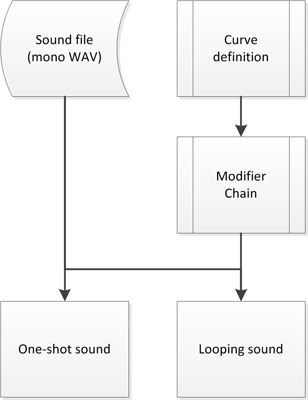
The proxy blueprint is where all the work is done. Any sound that gets played in the game consists of the elements shown in this diagram.
Each sound (the 'sample') is played either as a one-shot sound (it gets played once, triggered by some event), or as a loop (it continues to play based on some condition). The sound can be modified by a modifier chain which in turn takes uses curves to determine exactly how to modify the sound. The curves are simple numerical data points that are used to lookup an input value, and change an output value accordingly. For example the input to a curve could be the speed of the train, and the output from the curve could be the pitch of the sound.
The simplest example of how all the components work together is to consider an engine sound that changes pitch with the speed of the train. For this, 5 elements are needed:
The engine sound should be a mono WAV file that loops - ie. the sound can be played over and over again with no noticable gap or change of sound at the point where it loops. The blueprint editor entry for the sound should look something like this:
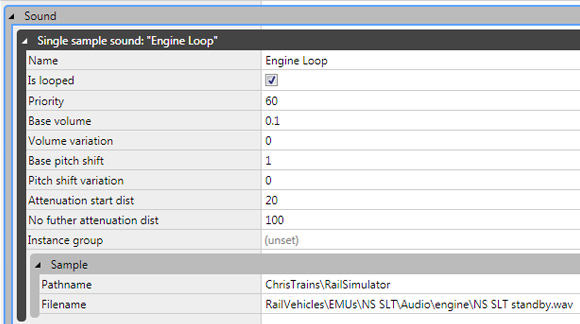
Note that the Is Looped checkbox is ticked. This is because when this sound plays, it needs to play continuously. The rest of the parameters are documented in the online audio blueprint wiki, and it does a better job of describing them than I can.
Important: Give the sound a meaningful name!
For this example, two curves are needed. One that alters the pitch of sound based on speed, and one that alters the volume of the sound based on speed. The volume curve is needed because without it, the looping sound would be playing even with the engine standing still. Curves are defined as pairs of points, denoted by X and Y values. The curve itself has no units - that comes later.
For the pitch curve, imagine an engine sound that plays at the original pitch of the WAV file at low speed, but at 1.5x the pitch once the speed has reached 80km/h. The pitch curve isn't really a curve, but a straight line defined by two points that looks like this:
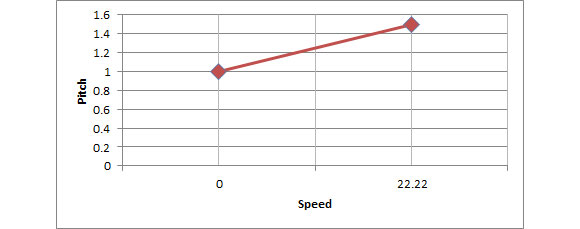
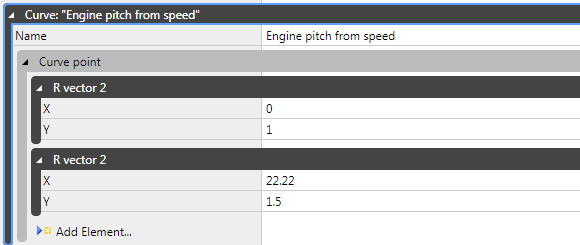
X-values are speed, Y-values are pitch. So the two points are (X=0,Y=1) and (X=22.22, Y=1.5). Notice that the speed isn't in km/h - all speed values for the audio blueprints are in m/s. So 80km/h = 22.22m/s. Important: Give the curve a meaningful name!
In the blueprint editor, this particular curve definition looks like this:
For the volume curve, imagine that the volume of the engine sound peaks at 40km/h then remains level to 60km/h and then drops off. In this case a curve with at least 4 points is required. Again it's not really a curve but a series of straight lines that join points together. X-value is still speed, but Y-value is now volume:
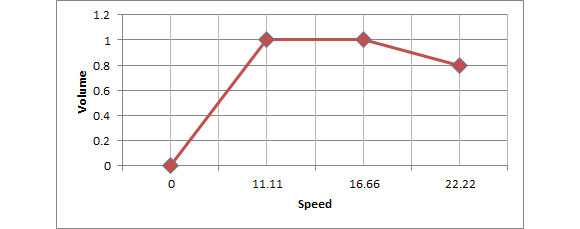
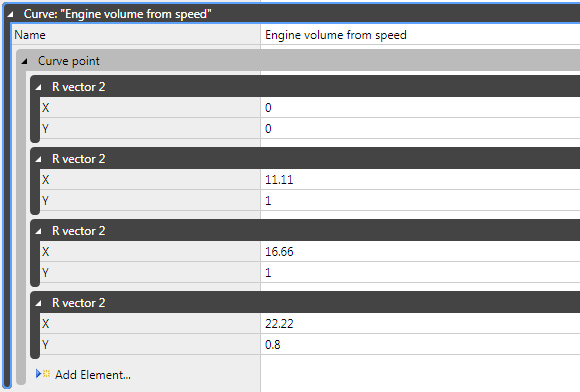
The four points are (X=0, Y=0), (X=11.11, Y=1), (X=16.66, Y=1), (X=22.22, Y=0.8). In the blueprint editor, this particular curve definition looks like this:
The modifier chain is the function that takes the curves and gives them their input values. The two most common modifier chains are the pitch curve modifier and the volume curve modifier. Important: Give the modifier chain a meaningful name!
Each modifier chain can have multiple modifiers. For this example, two are needed; one to modify the pitch of the sound, and one to modify the volume. In this case, the input to both curves is the speed of the engine. The modifier chain looks like this:
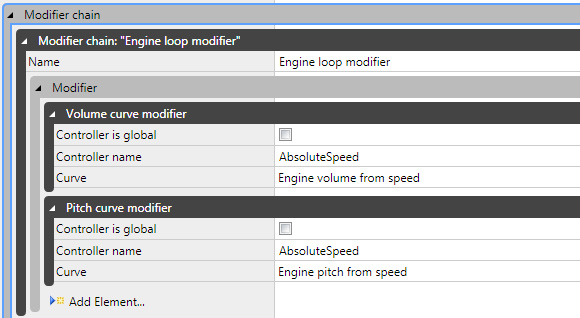
This is why I have been highlighting that it is important to give your sounds and curves meaningful names. You can see in the above image that the pitch curve modifier is using the curve that was created higher up in the blueprint, named Engine pitch from speed. The Controller Name is the input to the curve. In this case, it is AbsoluteSpeed, meaning that as the absolute speed of the engine is fed into the X-value of the curve, the pitch is returned from the Y-value.
The volume modifier uses the previously-created Engine volume from speed curve, feeding in the absolute speed to the X-value, and getting the volume back from the Y-value.
The Controller Name can be any of the keywords listed on the audio control wiki pages, or any of the controls on the engine itself. For cab audio, this can include the cab controls. For example a curve and modifier could be created that mapped the position of the regulator to the volume of an audio loop. In that case, the Controller Name would be Regulator. The curve would need X-values from 0 to 1 (corresponding to the regulator position going from off to full throttle), and Y-values to represent the volume of the sound.
The controlled loop is where the original sound is linked to the modifier chain. For this example, the controlled loop looks like this:
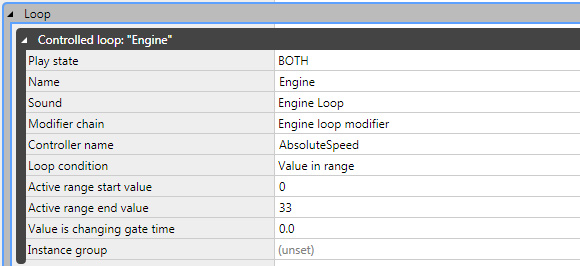
Again, making these controlled loops is much easier if meaningful names have been given to the sounds and modifiers. Here the sound is played both internally and externally, using the Engine sound, with the Engine loop modifier modifier chain applied to it. There is an important distinction here. The Controller name in the controlled loop does not necessarily need to be the same as the Controller name in the modifier chain. In this case it is because the engine sound should be played whilst the speed of the engine is between 0 and 33m/s (remember - speed values are all in m/s).
Looping sounds are quite complex, but one-shot sounds are considerably simpler. These sounds are typically very short samples that are played once a specific condition is met.
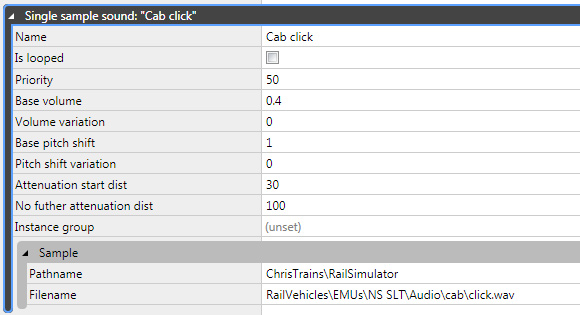
Much like the looping sound, the one-shot sound is basically the same with the only real difference being that the Is looped tickbox is not ticked:
It is very unusual to see curves and modifier chains used for one-shot sounds, as generally speaking they're not needed.
Much like the controlled loop, the triggered one-shot references the sound and (if created) a modifier chain:
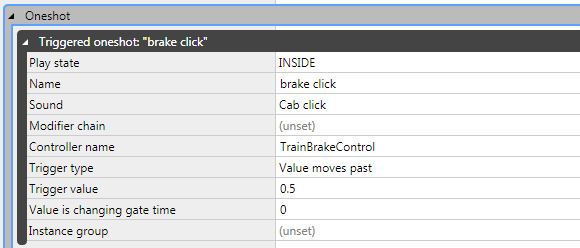
In this example, the Cab click sound will be played each time the TrainBrakeControl moves past a value of 0.5 (the Trigger value). It doesn't matter if the control is being increased or decreased - the sound is played each time.
There are other options for the Trigger type - for example sounds can be played only when a value increases upwards past a particular trigger value.
Because the sound definition can be ticked as Is looped, it is possible to make a looping sound play when a one-shot condition is met. For example an alarm sound could be created so that it loops, and then be activated using a one-shot trigger that looks for a Controller name of Alarm that increases above a trigger value of 0.25. The problem with trying to make loops this way is that there is no way to turn them off again. Once the sound has been triggered and starts looping, it runs forever. Generally speaking, this isn't a good way to make looped sounds.
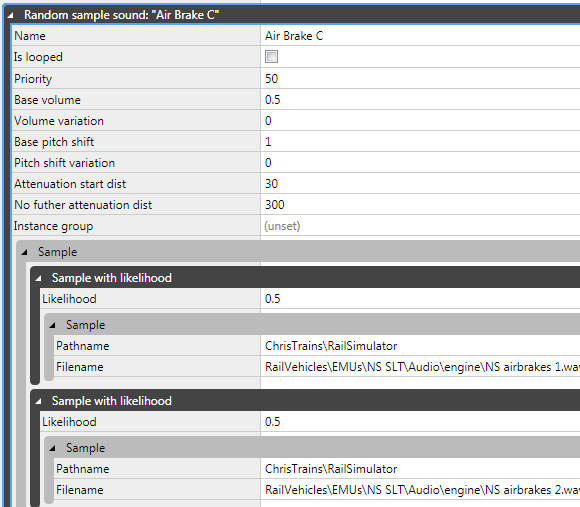
When defining the sound samples at the top of the blueprint, there are actually two different types of sample. This page has dealt with single sample sounds but there are also random sample sounds. These sounds are similar but rather than just listing a single .WAV file, they list a series of them with a probability. For example when playing air brake sounds, it would become unrealistic if the same sample was played every time the sound was triggered. So a random sample sound can be set up as shown here. In this case, the sound has two samples to choose from, each with a 50% chance of being played. What this means is that each time the Air Brake C sound is called from a one-shot trigger, there's a 50% chance that NS airbrakes1.wav will be played, and a 50% chance that NS airbrakes2.wav will be played:
What I've covered here are the basics for getting sound into an engine or scenery object. The principle is the same for almost every object type in the game. Experiment with the blueprints and you'll discover they are very powerful.